

Cleaning tips for game cartridge contacts
When a game doesn't play well or doesn't load on the screen, it's probably because the cartridge contacts are dirty or dusty and need a good cleaning. Here are the different options to clean up and get your games running on the first try:
Cartridge dusting (regularly)Although we've all made this childhood mistake, try not to succumb to your urge to blow into the cartridge slot to dust it off. In your breath, are air and salivary particles (sputters); these will be harmful in the long term for your games and may cause oxidation on the printed circuit board (PCB). Instead, use a paintbrush, toothbrush, compressed air can, air compressor or even a small vacuum cleaner.
Quick and basic cleaning (once a year)To perform a basic cleaning on your game cartridge to keep it running smoothly, it couldn't be any easier... Grab a cotton swab and some rubbing alcohol (Isopropyl alcohol 90% or higher is preferred) and scrub the slot and the contacts of the game's electronic circuit. You can swipe a glasses cloth or a soft paintbrush through the slot to remove any remaining traces. Be sure to allow the cartridge to dry thoroughly before playing it again.
Complete and deep cleaning (upon purchase and as needed)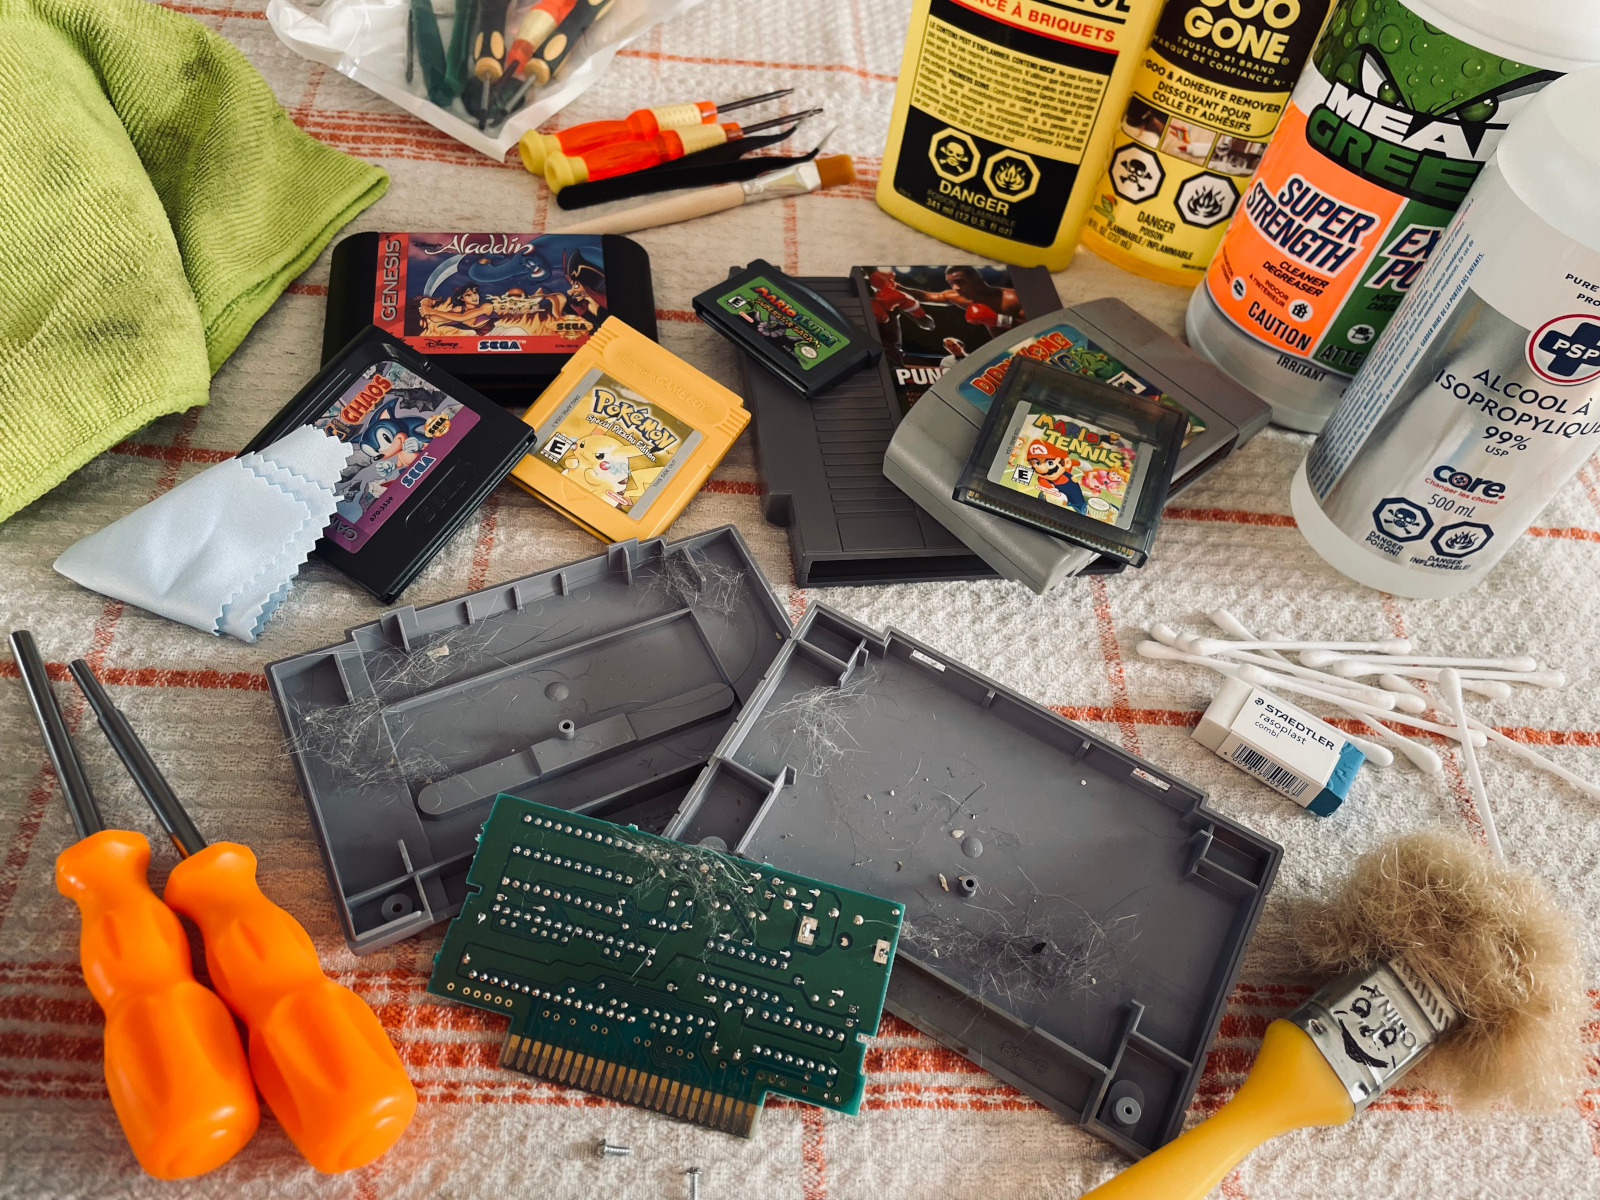
For a really good cleaning of a Nintendo or SEGA game "cart", I strongly recommend you to open and disassemble it in order to have access to each component. This is the only way to properly remove all dust and unwanted (or unidentifiable) matter from inside game cartridges. It will also make it easier to spot any rust or end-of-life component issues.
You will need a basic maintenance kit which contains : a security screwdriver (3.8 or 4.5 mm "Gamebit") for Nintendo, Super Nintendo, Nintendo 64, Game Boy and Sega genesis games, a tri-wing screwdriver (2.5 mm "Y") for Game Boy Advance games, an eraser, rubbing alcohol (Isopropyl alcohol 90% and above preferred), a brush or soft paintbrush and a glasses cloth.
- Open your retro game cartridge with the proper tools;
- Gently run an eraser over the contacts (“pins”) of the printed circuit board (PCB) to polish away any traces of use;
- Gently scrub all surfaces of the printed circuit board (PCB) with a soft paintbrush or toothbrush;
- Clean with an eyeglass cloth and rubbing alcohol;
- Inspect and test the voltage (3V) of the save battery (if there is one and if you have a multimeter);
- Make sure everything is clean and dry before closing.

Cleaning tips for game cartridge shell and label
Before I begin, I would like to warn you against excessive scrubbing and cleaning of your game labels; you could easily damage and remove ink from these. Some game cartridges have a good quality label with a glossy finish that protects the print, others like Nintendo 64 games, Super Nintendo (Assembled in Mexico) and some Sega Genesis games don't have this protection and their labels are very easy to damage. For these or any other damaged labels, it is best to leave any dirt, writing or stickers to avoid a catastrophe!
For cleaning the plastic from the shell of a game cartridge, I like using a good degreaser like "Mean Green", but any cleaner that is gentle on plastic and non-abrasive will do. As a general rule, I finish with a little water and/or rubbing alcohol to remove any remaining marks. Always rub in the opposite direction of the label to avoid peeling it off or soaking the edge with products.
For cleaning a label with a gloss finish, I recommend rubbing alcohol (90% and above alcohol preferred). Always rub gently from the center of the label outwards to avoid peeling it off or soaking the edge with products.
Pro tips and tricks
Over the years, I have accumulated and borrowed many surprising techniques to restore video games for my personal collection and my business. Here are some tips you might find useful:
- To remove rust, verdigris or battery leakage: Baking soda / White vinegar / Rubbing alcohol / Solvent (Acetone, Propanol or White Spirit);
- To clean the printed circuit board: Isopropyl alcohol / Electronic contact cleaner;
- To remove stickers: Lighter gas / Goo-Gone / Rubbing alcohol / Hair dryer / Plastic scraper / Let your nails grow;
- To remove marker: Eraser / Rubbing alcohol / Magic eraser soaked in a little water / Marker with dry eraser;
- To protect your games against dust: Sleeves (Dust Cover) / Clear plastic protectors …
Techniques to avoid
Due to lack of experience, I also made a few blunders during my early days as a video game collector. Here are a few things I wish I had known earlier:
- Don't blow into the game cartridge slot;
- Don't apply too much product when cleaning close to the label of a game;
- Don't use a water-based cleaner on the printed circuit board (PCB);
- Don't use an overly abrasive cleaner or product on the contacts: Brasso / Sandpaper / Magic Eraser / Abrasive sponge;
- Don't use solvent on plastic;
- Don't test a new technique on an expensive game...
Last word
You might be surprised, but some stickers can be very important to avid collectors as they tell the story of some old game cartridges. In particular, game cartridges that feature the “NOT FOR RESALE” or “BLOCKBUSTER” identification stickers are often considered as holy grails and may be worth more. Inform yourself before removing them!